HISTORY
AND ARCHAEOLOGY OF RAAF CATALINA FLYING BOAT A24-1*
By Silvano Jung
Delivery flight to Australia
On 31 December 1940, F. B. Clapp, the Australian Government Trade Commissioner
in New York, sent a cable-gram to the Australian Prime Minister’s
Department notifying that the British designation for the Patrol Bomber
Consolidated (PBY) was, for brevity, to be officially changed to ‘Catalina’
(Series: A1608/1, Item: K17/1/2 Part 1, National Archives). The Australians
followed suite. Shortly afterwards, the Royal Australian Air Force (RAAF)
was to receive its first of 253 Catalina Flying Boats, from Contract AUS
58 (Wilson 1992:63-64; Series: A1608/1, Item: K17/1/2 Part 1, National
Archives of Australia). The following is an account of the operational
life of the RAAF’s first Catalina, A24-1 (ex-AH534, ex-VH-AFA) and
an archaeological report on the aircraft’s current condition in Darwin
Harbour.
A24-1 was meant for the Royal Air Force (RAF) as part of their initial
order for Flying Boats from Consolidated Aircraft Corporation in San Diego,
California. The first registration number for this aircraft was, therefore,
a RAF number, AH534. However, the RAAF Flying Boat order was not ready
by the time the Australians arrived to pick-up their aircraft. The Australian
and British Governments then came to an agreement whereby the RAF would
give one its Catalinas to Australia with the understanding that the RAAF
would then give its first production scheduled Flying Boat from Consolidated
to the RAF (Wilson 1991:22).
Until 7 December 1941, America was still neutral and as a result, the
delivery flight of A24-1 to Australia had to be flown by an American crew
and that legal title would be transferred to Qantas in Honolulu (Series:
A1608/1, Item: K17/1/2 Part 1 and Item: K17/1/2 Part 2, National Archives
of Australia). The aircraft also had to be marked with civilian registration
and was subsequently given the letters VH-AFA (Photo 1). A Consolidated
Company aircrew subsequently flew AH534 to Honolulu. These people were
McMakin, Captain; Mitchell, Navigator; McFarlane, Radio Operator; Wallace,
Flight Engineer (Series: A1608/1, Item: K17/1/2 Part 1, National Archives
of Australia). Qantas crews, who were part of the Qantas Long Range Operations
Division, would fly the rest of the Journey to Australia (Vincent 1981:12;
Wilson 1991:22).
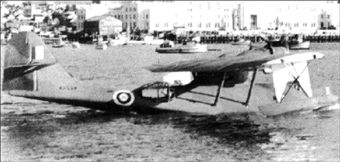
The RAAF’s first Catalina, A24-1, pictured at San
Diego in early 1941 and still wearing
its Royal Air Force serial number; AH534. For the delivery flight to Australia
it was allocated
the civilian registration VH-AFA’ (Wilson 1991:22)
The Qantas crew waiting for their renamed Catalina VH-AFA in Honolulu,
was initially made up of: Allan, Denny, Chapman, Bemrose, Clark, Richmond,
and Rowson. The second Catalina, AH535 was to be delivered to the British
in Singapore and crewed by Brian, Taylor, Nicoll, Jaques, Wright, Roughton,
Tennant and Sloane. This crewing arrangement, however, changed when the
delivery to Singapore was cancelled.
The final crew list for VH-AFA’s flight to Australia is based on
a letter from the Australian Prime Minister’s office dated 20 January
1941. The letter stated that the actual crew for the first flight was
to be:
Captain L.J. Brain, Manager, Flying Operations, of Qantas Empire Airways
Ltd., will be the Captain in charge of the first flight, and Captain P.G.
Taylor will act as Navigator. In addition to the Qantas crew of five,
certain R.A.A.F. personnel are also being carried on the flight from Honolulu
to Australia, Yours faithfully, R.G. Menzies.
(Series: A1608/1, Item: K17/1/2 Part 1, National Archives
of Australia).
The other unnamed personnel were A.S. Patterson, Radio
operator and D.H. Wright as Flight Engineer. The three unnamed RAAF personnel
in the Prime Minister’s letter were Allan, Bemrose, Flight Sergeant
W. D. Richmond (1215) and Qantas reserve Captain O.D. Denny
(Series: A1608/1, Item: K17/1/2 Part 1, National Archives of Australia).
'The first Catalina flying boat to be delivered to the
Australian Government, being
refuelled before departure in America, 26 January,
1941'
(Bennett/Bremner 1944; 12 - 13).
AH534, however, departed from San Diego to Honolulu on 26 January 1941,
with at least one Australian on board, Captain Patrick Taylor (Photo 2).
The Catalina reached its destination on 27 January, after a distance of
2,371 nautical miles (4,392km) which required almost a full day in the
air (Wilson 1991:22). The next leg of the journey to Canton Island was
delayed until early 29 January owing to bad weather. Canton was reached
that evening. There is no further record of the flight after Canton Island,
as records only show the details of the flight of the second Catalina,
AH535. There is one document, however, a telegram sent by Captain Brain
to Qantas Airways in Sydney, acknowledging that VH-AFA was in French Noumea:
'Frogs Legs tomorrow, home Sunday. Lester' (Series: A1608/1, Item: K17/1/2
Part 1, National Archives of Australia). VH-AFA was received at Rose Bay,
Sydney, on 2 February 1941 (Riddle 1992:11).
‘A group of four RAAF men (left) and four from Consolidated
Aircraft
Corporation (right) pose in front of A24-1, in San Diego on 26 January,
prior to its delivery to Australia. From the left: unidentified, Geoff
Nicholl,
P.G. Taylor. The rest are unknown’
(Australian War Memorial, Neg. No. P02515.003).
The delivery flights of the first eighteen Catalinas to Australia by Qantas
pilots represented achievements in long distance flights that were pioneering
in aviation history. The delivery flight of A24-1 was only the third time
the Pacific had been crossed by air (Wilson 1991:22). The first crossing
was made by Charles Kingsford Smith, Harry Lyon, Charles Ulm and Jim Warner
in 1927 (Smith and Davies 1980:34, 39). Their journey in the ‘Southern
Cross’, began from San Francisco and staged through Honolulu, the
Phoenix Islands, the Fijian Islands, and arrived in Brisbane (Smith and
Davies 1980:39).
The second crossing of the Pacific was again with Kingsford-Smith, but
with only one other person, P. G. Taylor, in a single engine Lockheed
Altair. They departed from Archerfield (Queensland) for San Francisco,
via Suva and Honolulu. Their destination was reached on 20 October 1934
(McLaren 1958:17). This is perhaps why Taylor went on the third trip across
Pacific in A24-1. He knew the route, but from the other direction ie.,
from Australia to America.
'The crew whom delivered the first Catalina flying boat
for the Australian Government,
on arrival at Sydney. From left to right; Flight Engineer D. Wright, Captain
L. J. Brain,
W/O Bemrose, Captain G. U. Allan, W/O Richmond, Captain P. G. Taylor'
(Bennett/Bremner 1944; 12 - 13).
There is no detailed log of the delivery of A24-1, except for a report
by P. G. Taylor on navigation procedures (Series: A1196/6, Item: 37/501/42,
National Archives of Australia). Taylor was an accomplished Australian
navigator. He held one of the few First Class Navigators’ Licences.
Of the eleven pilots who flew the early ferrying trips, he was the only
one to hold the First Class Navigator’s Licence. His experience was
invaluable during the A24-1 delivery flight, as he knew ‘Guba’;
a Catalina hired from Richard Archibald to survey an alternative aerial
route from Australia to England, in the event that Singapore might fall
(Vincent 1981).
The crossing of the Pacific in A24-1 was made using a combination of navigation
methods, including combination of dead reckoning, radio direction finding
and astronomical recordings. Taylor recommended that navigators have a
sound basis in each of these methods, as each has to be cross-checked
to ensure their reliability. For instance, astronomical readings could
not be done during daytime flights or during flights in bad weather. Direction
finding signals were also suspect, but an invaluable aid nonetheless.
For instance, direction signals received from both Honolulu and San Francisco
consistently put the aircraft 150 miles north of its true position, which
had been verified by solar fixes using sextant (Series: A1196/6, Item:
37/501/42, National Archives of Australia). As a result, it was considered
essential that a sound basis of all three be available to the navigator
on the trans-Pacific flights.
Post delivery operations
From Rose Bay Captain Sims flew A24-1 to Melbourne, where technical specialists
inspected it (Series: A10297/1. Item: Block 141, National Archives of
Australia). A24-1 was used thereafter for sea plane training in New South
Wales until significant Catalina losses required it to be brought into
front line service (Riddle 1992:8). On 14 March 1941 the aircraft was
issued to No 11 Squadron at Port Moresby. A24-1 arrival at Port Moresby
on 19 March, with the following crew:
Eric Sims - 1st Pilot Alan Whitsed - 1st W/T
Norm Robertson - 2nd Pilot Harvey - 2nd W/T
Mick Larkins - 1st Engineer Jack Dunne - 2A
Unknown - 2nd Engineer Col Dun - Armourer
(Riddle 1992:11)
A24-1, together with A24-2, A24-3 and a number of Qantas Empire Flying
Boats commenced the operations of carrying RAAF personnel and equipment
to the Advanced Operational Bases (AOBs) and continued patrolling Australia's
outer defence perimeter. On 14 August 1941, A24-1 was allocated to No.
20 Squadron until engine changes had to be carried out at Rathmines on
2 September 1941 (Series: A10297/1. Item: Block 141, National Archives
of Australia). After nearly two months of complete overhauls and repairs
at Rathmines, A24-1 was eventually received back at No. 11 Squadron on
15 December 1941.
On 14 January 1942, A24-1 was recorded as having flown a reconnaissance
of the Gilbert Islands, taking 100 photographs of nine islands. The aircraft
was operating from Tulgai at the time and under the command of Squadron
Leader Cohen (Hendrie 1988:148).
In February 1942, A24-1 grounded on a reef, but was still serviceable
and was flown back to Rathmines for repairs. These repairs took over four
months and upon their completion, A24-1 was allocated back to No. 11 Squadron
at Port Moresby and received there on 29 July 1942 (Series: A10297/1.
Item: Block 141, National Archives of Australia).
Upon its return to active service A24-1, under the command of Captain
Harry Tamblyn, bombed Rabaul on 9 August 1942. After this time, it appears
that A24-1 may have been flown back to Rathmines as it is recorded that
the crew, who were sent on leave, were to return in A24-1 with Captain
Clem Haydon who had recently finished his captain’s course (Riddle
1992:32).
In September 1942, A24-1, flown by Clem Haydon, was back in active service.
Together with one other Catalina (A24-25), A24-1 bombed Buin on 27 September
1942. This was Clem Haydon’s first bombing run as captain (Riddle
1992:32). Two nights later A24-1, this time with a new captain Eddy Allison,
attached Buka aerodrome and returned back to Cairns after an eighteen
hour return trip (Riddle 1992:32). On that same night A24-1 (flown by
Captain Clem Haydon) together with A24-4 continued the attack with another
raid on Buin (Riddle 1992:32).
Buin was bombed by A24-1 (with Clem Haydon as captain) and three other
Catalinas on the night of 1 October 1942 (Riddle 1992:33).
Captain Mike Seymour then flew A24-1 on an uneventful seventeen hour convoy
patrol on 6 October (Riddle 1992:35). On 9 October A24-1 (with Mike Seymour
as captain) was one of seven Catalinas that made up a strike force to
attack Rabaul.
Their objective was to act as path finders for B17 bombers by lighting
up the target with 500 incendiaries (Riddle 1992:34). On 12 October A24-1
(again with Mike Seymour as captain), together with five other Catalinas,
bombed Buka (Riddle 1992:34). Towards the end of October A24-1 (Mike Seymour
as captain) was involved in another bombing mission against Buin on 21
October. The target switched to Kavieng on 24 October. Captain Eric Townsend
flew A24-1 on this occasion (Riddle 1992:34). Buka was the next target
for six Catalinas. A24-1 was one of these and was flown by Captain Frank
Chapman (Riddle 1992:34). Shipping in Buin, Faisi and Tonolei were attacked
by the Catalinas on 29 October, including A24-1 flown by Captain Mike
Seymour (Riddle 1992:34). Operations for October ended by another attack
on the same targets, shipping in Buin, Faisi and Torrolei. A24-1, on this
occasion, was again flown by Mike Seymour (Riddle 1992:34).
The operations record then indicates that A24-1 was not involved in further
missions until 14 November 1942, when Kahili aerodrome at Buin in the
Solomon Islands was attacked. Eight aircraft were destroyed on the ground
and an ammunition dump was set on fire (Riddle 1992:35).
A24-1 is again recorded as having participated in a raid on Kahili aerodrome
on 16 November 1942 (Riddle 1992:35; Honan 1989:48). Flight Lieutenant
Seymour was the captain with Sergeant Honan as the co-pilot. A24-1 was
part of a strike force consisting of aircraft from both 11 and 20 Squadrons
(Honan 1989:48). Three large fires were started on Kahili and all the
aircraft returned back to Cairns at 0700 hours the next morning after
a sixteen and a half hour flight (Honan 1989:48). The next morning, 18
November 1942, A24-1 was used for a different operation, providing escort
for Australian ships going to and coming from New Guinea.
The Catalinas were used for anti-submarine patrols for individual ships
and convoys on a regular basis by late 1942. On 14 November 1942, A24-1
was recorded as having escorted the SS Katoomba enroute to Australia from
Port Moresby (Honan 1989:47). A24-1 did another escort mission for the
HMAS Ballarat, Katoomba and four other ships: Balikpapan, Japara, Bantam
and the Liberty ship John B. Ashe (hull number 82) on 18 November 1942
(Honan 1989:48). Escorts were also conducted for the HMAS Benalla, HMAS
Bunbury and their convoy on 22 June 1943 (Honan 1989:88-89).
Honan (1989) details the operations of A24-1 on 18 November 1942 as having
departed on a reconnaissance flight to search for Japanese ships in an
area between New Guinea and New Britain known as Run M, otherwise referred
to as the ‘Milk Run’ (Honan 1989:48; Riddle 1992:36). A24-1,
however, developed an oil leak and had to return to Cairns. Repairs were
carried out and the next evening A24-1 ‘flew another uneventful nineteen
hours’ (Riddle 1992:36). On 20 November 1942 Captain Mike Seymour
then flew A24-1 to bomb Kavieng (Riddle 1992:35).
A24-1 was sent on a reconnaissance mission on 21 November 1942. A24-1,
however, still had mechanical problems and departed for Number One Flying
Boat Repair Depot (1FBRD) at Lake Boga, Victoria, on 24 November 1942
for repairs (Honan 1989:49). After this, Captain Frank Chapman is recorded
to have flown A24-1 on a bombing mission to Faisi on 29 November, presumably
from Cairns (Riddle 1992:35).
After repairs at 1FBRD, A24-1 returned to Cairns. On 4 December Captain
Frank Chapman flew A24-1 in an uneventful twenty-four hour patrol along
the Milk Run (Riddle 1992:36). On 17 December Chapman again flew A24-1
in an uneventful sixteen hour Milk Run flight from Milne Bay to Cairns
(Riddle 1992:37). The reconnaissance flights continued with another flight
by A24-1 that same day, but this time operated by Captain Bill Clarke,
who also made no sightings of the Japanese (Riddle 1992:37). Clarke later
flew A24-1 on its next Milk Run reconnaissance mission from Milne Bay
to Cairns on 29 December (Riddle 1992:37).
On 10 December, however, the monotony of the Milk Run for A24-1 was broken
when it was assigned a mission to fly to a secret location code-named
‘Augusta’ (Honan 1989:49). ‘Augusta’ was Merauke,
a village in Dutch New Guinea. Japanese reconnaissance aircraft had been
sighted around the area and A24-1 was sent to locate their base on a daylight
reconnaissance. Flight Officer (F/O) Bill Clarke was the captain for this
mission and he alighted on the Merauke River at 1225 hours after a seven-hour
flight from Cairns. From Okabo, A24-1 conducted searches for the Japanese
to the west around Frederik Hendik Island, but found nothing and returned
to its mooring on the Merauke River later that day (Honan 1989:50).
The next day, 11 November 1943, A24-1 went on a photographic reconnaissance
flight to search for the Japanese westward along the coast. Locations
such as the Moah River, Jar River and adjacent delta rivers were inspected,
but found to be too shallow and unsuitable for shipping. Flamingo Bay
was found to be a good location for shipping or an aircraft base, together
with locations on the Torpedo Boat River and at Atabo, further west along
the coast (Honan 1989:50).
After this flight, A24-1 needed re-fuelling. This was conducted from barrels
under difficult conditions on the swift Merauke River. A24-1 then took
off for Horn Island near the tip of Cape York Peninsula and refuelled
there also. Once this was done, A24-1 went on searching for the Japanese
on a flight across the Arafura Sea towards the Wessel Islands on the same
day, but found nothing and returned to Horn Island that evening. On the
following day, A24-1 flew to Townsville. Searches for the Japanese continued
for the rest of December 1942 (Honan 1989:51).
On 1 January 1943, A24-1 was in Cairns and flew to Merauke with Wing Commander
Minchin. The aircraft had returned to Merauke to find a suitable evacuation
point for Catalina operations. Minchin was taken by A24-1 to inspect the
selected spot on 3 January 1943. A24-1 then returned to Merauke and after
taking on passengers and the mail, flew to Cairns.
Captain David Vernon flew A24-1 from Cairns on 4 December and went into
Milne Bay to bomb the Gasmata airstrip (Riddle 1992:38). On its return
to Cairns, the aircraft was due for its 240 hours service and was flown
to Bowen on 9 January 1943 (Honan 1989:52). But prior to its flight to
Bowen, A24-1 sank a Japanese ship. This episode in the aircraft’s
history illustrates one of the successes of the night operations performed
by Catalinas and is described below.
In early 1943, A24-1 continued shuffling between 1FBRD and 11 Squadron
for major repairs and maintenance. During operations while with 11 Squadron
on 6 January 1943, A24-1 sank the passenger-cargo vessel Nichiryu Maru
of 5,447 tons in position 6° 30' S, 149° E (Hendrie 1988:153;
Riddle 1992:38). Squadron Leader (later Group Captain) David Vernon was
the Captain of A24-1 (co-pilot was P/O T. Harrison) during this engagement,
which he describes in detail, 50 years after the event in Minty’s
(1994:31-35) book Black Cats.
A24-1 was detailed with an unknown Catalina from 20 Squadron (piloted
by Squadron Leader T. V. Stokes) to look for a Japanese convoy that was
reported to be enroute from Rabaul to Lae (Hendrie 1988:152). The two
aircraft were to track the convoy and report its movements. The unknown
Catalina found the ships and signalled A24-1 to their position. Vernon,
prior to meeting the Japanese ships, considered the possibility of an
opportunistic bombing run on a Japanese air strip on Gasmata, which was
along the course to the target. A24-1 dropped four high explosive bombs
on edge of the airstrip and strafed aircraft on the ground, then continued
on to intercept the convoy (Vernon 1994:32). The aircraft still carried
four 250-pound anti-submarine bombs.
The initial plan was that once the Catalinas spotted the convoy, USAF
bombers from Port Moresby would attack them. No word had come from operational
control about a possible attack, and the approaching dawn indicated to
Vernon that they had to attack soon (Vernon 1994:33). Hendrie (1988:152)
indicates that the American aircraft did arrive at the scene and were
illuminating the convoy when A24-1 arrived there, but why these aircraft
did not participate in the attack is unknown.
The convoy consisted of five merchant vessels steaming in a line with
three naval escorts, one leading and one abeam on each side (Vernon 1994:33).
They represented a formidable anti-aircraft screen, but surprisingly,
when Vernon commenced his bombing run the ships had not noticed him. Flight
Lieutenant George Leslie was A24-1’s navigator/bomb aimer on this
flight and owing to intermittent low level cloud he had trouble getting
a satisfactory aim on the ships. He instructed Vernon to bring A24-1 around
for another run from astern, giving them the choice of six targets. The
second to last transport vessel in the line was chosen. The ship was seen:
‘exploding throughout its length, and one of our lookouts reported
“Vessel struck by three of the four bombs”’ (Vernon 1994:33).
The ferocity of the explosions made the captain believe they had hit a
ship carrying ammunition; the ship was actually carrying between 600 and
700 troops (Hendrie 1988:153).
The passenger-cargo vessel Nichiryu Maru exploded with the loss of all
aboard except for six men who were later seen in a whaleboat (Vincent
1981:30; Riddle 1992:38). Beaufighter crews saw these survivors, together
with four empty lifeboats the following day (Hendrie 1988:153). The IJN
Maikaze picked up an unknown number of survivors on 7 January 1942 (Nevitt
1996). Four days later, the same convoy was attacked again by Vernon,
who sank one merchant vessel east-south-east of Gasmata, but it is unknown
whether he flew in A24-1 for this mission (Hendrie 1988:153).
A24-1’s next mission was to bomb Gasmata again on 29 January 1942.
Captain Bill Clarke flew A24-1 for this mission, which from Cairns to
Gasmata and back took twenty hours (Riddle 1992:39).
Milk Run operations continued in early February 1943 with Captain Eric
Townsend flying A24-1 on 1 February, without sighting the Japanese. Captain
Norm Robertson flew A24-1 from Cairns on 7 February. Clem Haydon, flying
from Milne Bay in A24-1 returned to Cairns on 11 February and Captain
Jack Daniell operated A24-1 from Cairns on 12 February. All of these patrols,
however, failed to find any Japanese shipping (Riddle 1992:40). Patrol
periods by A24-1, however, were interspersed with bombing raids on Kahili
on 2 February (Bill Clarke as captain), on 3 February (Frank Chapman as
captain) and on 5 February (Norman Robertson as captain) (Riddle 1992:40).
Buin was bombed by A24-1, under the command of Eric Townsend, together
with three other Catalinas on 17 February 1943 (Riddle 1992:40).
A24-1 is recorded as having taken part in another raid against Ballale
Island immediately south of Bougainville Island on the night of 19 February
1943, under the command of Squadron Leader Vic Hodgkinson, who provides
an insight into the standard and non-standard armament used by the Catalinas:
The standard bomb load was eight 250lb GP bombs fuzed [sic] nose and tail.
"Grass cutter" extensions were fitted to the nose fuzes [sic].
The appendage consisted of a 3ft metal rod having a small disc fixed to
the forward end. On contact with the ground, the bomb exploded some three
feet above, thus spreading the blast and shrapnel in all directions. Hence
"grass cutter". In addition to this load we carried twenty 20lb
bombs plus 25lb incendiaries. These were stowed inside the aircraft and
fuzed [sic] and thrown out of the blisters by hand. There were also our
own personal gifts to the Japs - beer bottles with razor blades inserted
in the neck made a terrific noise and a supply of these helped to keep
the enemy awake. To complete the load, crew armourers made their own devices.
One of these consisted of a Mills bomb, the idea being that when the tennis
ball hit the ground, it would bounce and pull the pin (Hendrie 1988:153).
Four Catalinas, departing from Cairns, successfully bombed the aerodrome
on Ballale Island again on 20 February 1943. A24-1 was one of these Catalinas
and it was flown on this occasion by Captain Clem Haydon (Riddle 1992:41).
On 21 February 1943, A24-1 returned to 1FBRD for a complete overhaul.
Once A24-1 was operational again, it was allocated to No. 3 Operations
Training Unit (3OTU) on 17 March marking the end of its combat role. A24-1
would now be used to train pilots in Flying Boat operations and despite
being damaged at sea during a training flight on 22 June 1944, would survive
WW2 (Series: A10297/1. Item: Block 141, National Archives of Australia).
Following the end of WW2, on 15 August 1945, a group of nine Catalinas
were drawn from 3OTU to fly medical supplies and RAAF personnel to Singapore
and to return with Australian prisoners of war.
It was while operating in this role that Catalina A24-1 crashed on take-off
and was abandoned on a mud bank in Darwin Harbour’s East Arm.Loss
of Catalina A24-1
Wing Commander Keith Bolitho (No. 407017) of 3OTU was the captain of A24-1,
which was the first to attempt to take off at 0800 hours. Weather conditions
in East Arm were poor for a heavily laden Catalina to get on the step:
light winds with little tidal movement. It was easier to get airborne
if the aircraft had waves to leap into the air from, but being heavy with
cargo and nine passengers, A24-1 eventually managed to fly after four
unsuccessful efforts. Shortly after take off, Bolitho noticed a serious
leak in the line leading to the oil pressure gauge (Series: A705/1, Item:
32/17/263. National Archives of Australia). He turned back to Darwin for
repairs. After mooring the aircraft to a buoy, Bolitho instructed the
engineer to top up the fuel tanks, for he anticipated another attempt
once the weather had improved by the afternoon to take off without the
trouble he had had that morning.
By 1600 hours, a slight breeze was blowing across the take off area and
Bolitho thought that it was worth another try. Taking advantage of the
crosswind he would attempt to take-off to the east.
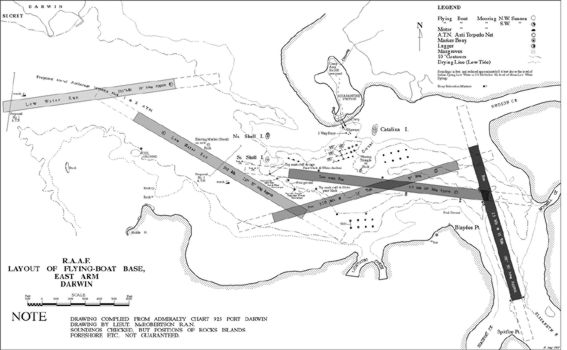 The
take off and alighting paths for the Catalinas in East Arm Flying Boat
Base, Darwin in 1945. (Series: A705/7. Item: 171/6/218. National Archives
of Australia).
The
take off and alighting paths for the Catalinas in East Arm Flying Boat
Base, Darwin in 1945. (Series: A705/7. Item: 171/6/218. National Archives
of Australia).
The above map illustrates the take off and alighting paths for the Catalinas
in East Arm in 1945. Judging from this and from the location of the wreck
site of A24-1, Bolitho had chosen flare path ‘C’. He received
permission to take-off and with the crash boat in position at the eastern
end of the run, A24-1 began taxiing to the northwest. A24-1 soon attained
a speed of 65 knots on the smooth water at full throttle and bounced into
the air. The airspeed, however, was not enough to keep the aircraft flying
and it dropped on to the surface, heavily. The aircraft bounced two more
times into the air, but on the third bounce, however, A24-1 leapt too
high.
Because the sea was still relatively flat, the captain had pointed A24-1’s
nose into the air at a steep angle to help break the water’s grip
on the hull. Thinking that he did not have the airspeed to keep flying
after the third bounce, Bolitho quickly cut the throttles and realised
that they would hit the water heavily. He could not accelerate again since
he had both hands on the steering yoke, trying to keep control of the
aircraft and was, hence, unable to reach the throttles, which protruded
down from the centre of the cockpit canopy.
The sound of tearing metal could be heard as the aircraft hit the water.
The navigator substantiated the captain’s fears after he had told
him that they were holed and sinking fast. Bolitho then spun the aircraft
around to see if the crash boat was close enough to take them in tow,
but noticed they were sinking too fast and would not make the tow. He
cut the engines and instructed Flight Sergeant Draper to assist with launching
the four dinghies, all of which inflated without trouble. He dropped back
down into the navigator’s compartment, grabbed a few personal belongings
and ordered the crash boat, which had come up along side by now, to take
off the people still aboard. Nearly waist deep in water now, Bolitho jumped
over board just as the aircraft sank at 1725 hours (Series: A705/1, Item:
32/17/263 and Series: A9845/1, Item: Box 11, National Archives of Australia).
In 1994 Andrew McMillan interviewed Catalina veterans and recorded their
version of events on two of the four RAAF Catalinas lost. Jim Rodgers
gives an account of the loss:
...our aircraft are overloaded sir. We can’t possibly go like this.
I pointed out to them that they weren’t over loaded and Keith decided
he’d show them that everything was alright and he promptly started
bouncing his aeroplane. But he had a theory that if you didn’t fly
after your third bounce you weren’t going to fly at all. And he’s
up about fifty feet in the air and he pulled his donks [engines] off and
goes bang on the bottom and the whole bloody hull on the bottom just caves
in (McMillan 1994a).
The aircraft quickly sank in shallow water, after stopping. Alic Emslie,
No. 20 Squadron leader, goes on to say what was salvaged:
And he sunk out in the area there and we got the crash boats out and we
got them off alright, but the aeroplane was nearly under, and all their
cargo was on board...Anyway we got the panniers out of the thing and that
night we managed to beach the aeroplane and I put the doctor and my Squadron
Leader duty officer on to make sure this was salvaged properly, and they
got down there and the doctor said “Oh these instruments are buggered,
they've been under salt water.” And all the airmen were hopping in
and souveniring them, and I had to get the bloody things back. The army
were pretty annoyed about it all. I got 'em back, the blokes were pretty
good (McMillan 1994b).
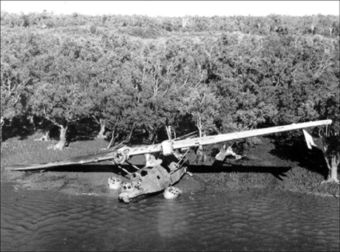
Bill Smart, photographed A24-1 shortly after it sank (Photo 3), and relates
that he had removed the radio and radar equipment in a two-hour operation
before total immersion took place (Dermoudy Research Files, Museum and
Art Gallery of the Northern Territory).

A24-1 shortly after a take-off crash. The machine is
yet to be hauled to its current
location (Bill Smart via Peter Dermoudy research files, Museum and Art
Gallery of
the Northern Territory).
A Court of Inquiry to determine the cause of the accident was held on
15 September 1945 at No. 43 Squadron, Doctor’s Gully. Bolitho was
the first witness in court. His statement, however, does not indicate
directly why he changed his mind and dropped the aircraft back down on
the water after that third bounce (Series: A705/1, Item: 32/17/263. National
Archives of Australia). Perhaps he stuck to his theory that if you were
not flying by your third bounce, you were not going to fly at all. The
following witness accounts point to the cause of the crash as pilot error.
Bolitho had committed himself to a west-east direction for take-off, for
no explicit reason. This presents a problem, insomuch that if the aircraft
does not fly by the end of the run, it would run out of surface water
to take off from and crash into the mangroves at the end of the run. If
Bolitho had decided to take off in the other direction, east-west, he
would have had ample room.
The reef in East Arm was not known to Bolitho, which may explain his choice
of which direction to take off from. It was also almost low tide at the
time of the crash and he would not be able to see the reef even if it
was just below the surface, because of the murky water. Squadron Leader
Alexander Emslie (No. 548), who knew Darwin Harbour well, stated that
the west-east run was in deep water the whole time, and that A24-1 could
not have sunk by hitting a sand bar (Series: A705/1, Item: 32/17/263.
National Archives of Australia). Faced with the poor take-off conditions
at the time ie., the water was smooth, the only way to have got the aircraft
to bounce was if the bouncing was initiated by the pilot. With the mangroves
at the end of the run coming up fast, Bolitho may have thought that he
would not make it and cut his engines, but at too great a height (Series:
A705/1, Item: 32/17/263. National Archives of Australia).
The teletype operator in No. 20 Squadron Signals Office was LAC John Rushbrooke
(No. 443692) and he monitored the radio communications between the crash
boat and A24-1 when the accident occurred. Each aircraft in the group
to fly to Singapore that day had a call sign. A24-1 had ‘K’
for King and the crash boat was known as ‘Boozing’. The following
describes the actions of the pilot in light of instructions given from
‘Boozing’:
At approximately 1630 hours, I heard K for King call
Boozing requesting take-off instructions. Boozing asked King to standby
for a moment while he got them from the Duty Pilot. Boozing then called
King and told him to take-off to the West, and there was very little wind.
K for King said he would like to take off to the East as he thought he
would get a better run that way. Boozing repeated his first instructions
to take off to the West as what breeze there was was [sic] from the West.
King then said he would make an attempt to take off to the East. Boozing
then warned him of a reef which was at the end of the run. King requested
the position of the reef. Boozing gave him its location. King then said
“I am now taking off”. There was then silence for several minutes
and the next thing heard was “Quick, quick, crash-boat”, which
came from King. Boozing said, “King from Boozing over” and there
was no reply
(Series: A705/1, Item: 32/17/263. National Archives of Australia).
The location of the reef is an important consideration as it has bearing
on which take-off route the captain took. Even though Bolitho was told
about the reef, the information he had received about its location was
ambiguous. He was only told that it ran out 150 yards off southern point
off shore. Which southern point off shore they were referring to, the
captain did not know (Series: A705/1, Item: 32/17/263. National Archives
of Australia).
Flight Lieutenant Peter Balston (No. 406767) of No. 76 Wing indicates
that Bolitho had had fair warning about the reef and that he had received
additional instructions from the Duty Pilot, on the crash boat, to take
off to the west, between a wreck (presumably the Kelat) and an island
(South Shell Island). Bolitho insisted that he would get more of a head
wind if he took off to the east. He was eventually authorised to do so,
after his third request, and given clear instructions on how best to avoid
the reef. He was to keep ‘closer to the last aircraft in the line
of buoys than to the southern tip’ (Series: A705/1, Item: 32/17/263.
National Archives of Australia).
Squadron Leader George Llewellyn Grendon (No. 2930), Commanding Officer
of No. 2 Flying Boat Maintenance Unit (2FBMU), examined the aircraft on
4 September, after it had been towed to its present location. He could,
however, not make an accurate assessment of the damaged area that had
torn on impact, because there was one foot of water in the hull. The bilge
was also considerably silted up. Grendon did make some observations of
the hull above the water and noted that three stringers had fractured
between stations 4.75 and 5, immediately below the chine on the starboard
side. He also stated that ‘there was also a hole in the planing bottom
immediately between those two stations extending from the chine to approximately
2 feet above the keel’ and that ‘no other external damage was
found’ (Series: A705/1, Item: 32/17/263. National Archives of Australia).
A24-1 was selected for the trip to Singapore because it had the most robust
hull out of the old Catalinas. It nevertheless needed some rivet replacement
before the trip, but generally speaking, the aircraft was fully serviceable.
The reason why it was abandoned, and not repaired, is indicated by Grendon’s
assessment of the crashed aircraft, lying forlorn on the mud in East Arm.
Despite the fact the airframe was old, it would not have been economically
viable to salvage the aircraft ‘due to rapid corrosion of aluminuim
[sic] alloy components and structure caused by alternative immersion in
salt water and exposure to air on the tide changes’ (Series: A705/1,
Item: 32/17/263, National Archives of Australia).
On 20 September 1945, A24-1 was allocated to 2FBMU for conversion to components.
It is fitting to end the document history of A24-1 here, with an anecdotal
account of its idiosyncratic nature. Roma Honan, widow of the late Robert
Honan, said that her husband had flown many Catalinas and that A24-1 was
his favourite: ‘Robert flew that aircraft on many missions and told
me that it was the best Catalina he had flown, it had no peculiarities
like most of the Flying Boats. He was sorry to hear that the aircraft
was lost on take off from East Arm’ (Honan, R. 1998, pers. comm.,
13 May). Honan (1989) explains what were those peculiarities inherent
in the other Catalinas that he had flown:
We were sorry to have lost the use of A24-1, which had
a certain nostalgia about it as it was the first Australian Catalina and,
besides which, it flew without the tendency to fly on what was called
the “hump”. Some of the aircraft tended to deceptively raise
their noses, of their own accord, and thereby lose airspeed. A24-1 was
number one in all respects
(Honan 1989:54).
Wreck site locations
The Catalina wreck sites occur towards the edges of the northern shore
and southern shore of East Arm in deep water between ten to sixteen metres
during neap low tide conditions (Fig. 2). Five of the six Catalina Flying
Boats sunk in East Arm have been found (below). A24-1 is exposed during
spring low tides of less than 2.5 metres.
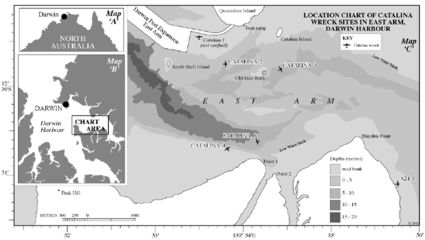
Location chart of Catalina wreck sites in East Arm,
Darwin Harbour.
Latitude and Longitude GPS coordinates (below) for the Darwin Harbour
Catalina wreck sites
Site Name Latitude Longitude Depth (M)
(South) (East) (neap low tide)
A24-1 12° 31.099’ 130° 55.751’ 2.5
Catalina 2 12° 29.750’ 130° 53.812’ 10
Catalina 3 12° 29.820’ 130° 54.410’ 12
Catalina 4 12° 30.710’ 130° 53.823’ 16
Catalina 5 12° 30.620’ 130° 54.170’ 14
A24-1 wreck site description
After Wing Commander Keith Bolitho crashed A24-1 in shallow water, the
aircraft was towed to a mud bank in East Arm to facilitate the salvage
of the medical equipment and other items from the wreck. Of all of the
Catalinas lost in Darwin Harbour, this is the only one that was brought
up upon a mud bank (see below).
Remains of A24-1 abandoned in mangroves in East Arm,
Darwin ca. 1974 (Aviation
Historical Society of the Northern Territory)
As a result, the wreck is exposed at a spring low tide below 2.5 metres.
The wreck site, to the east of Blayden Point, is highly visible enroute
to the Elizabeth River from the Quarantine Island boat ramp. The wreck
site previously resembled an articulated aircraft and was clearly discernible
throughout the ages to any passers by. The wreck site was broken up and
scattered by Cyclone Tracy on 25 December 1974 (see below).
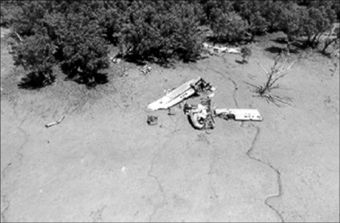
Aerial photograph of the main wreck site of A24-1 and
debris field.
(Peter Dermoudy research files, Museum and Art Gallery of the Northern
Territory n.d).
Even though
A24-1 has always stayed in the public eye, an assessment of the surviving
remains has not previously been made. How much of A24-1 did Cyclone Tracy
leave behind? Wreck inspections were carried out with the aim of recording
the extent of the surviving material resource.
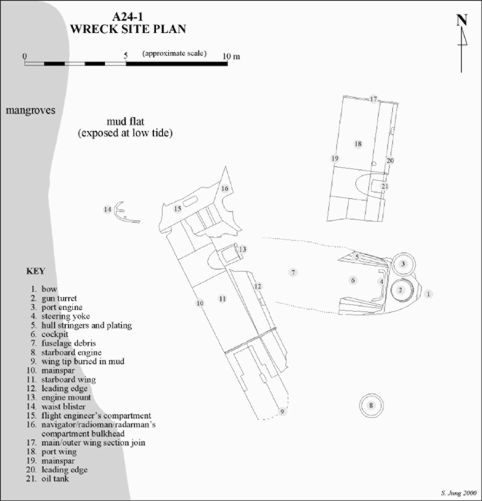
A24-1 site plan
A24-1 wreck site plan.
The bow of this Catalina points to the water’s edge, indicating that
it was towed/dragged tail first into the mangroves. The bow section is
disconnected from the rest of the fuselage behind it, by a break through
the cockpit (Photo 6). While the rest of the fuselage is lying flat just
behind the bow section, the bow has instead of settling flat like the
cockpit area (below) developed a list to port at an angle of approximately
40° (Photo 7). The starboard side hull of the forward section is clearly
visible, whereas the port side is lying on the mud (Photo 8). The upper
portions of the forward section have gone,
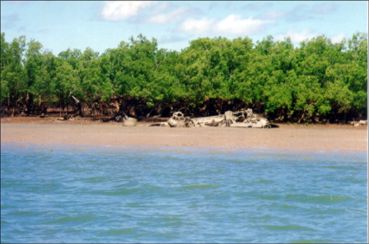
photo 6. Main wreck site of A24-1 as approached by boat
at spring low tide (Photo: Jung 1998)
revealing the internal workings of the cockpit area and the navigator’s
section (Photo 9). Internal hull stringers and ribs can be seen in the
cockpit, together with other structural elements such as the No. 1 bulkhead
leading from the cockpit though to the gun turret. The cockpit area also
has the control yoke, but no steering wheels were seen (Photo 10). Other
internal features were seen such as the pilot’s foot rests (Photo
11), masses of wiring and a number of instruments and gauges. The flight
instrument panel, however, was not found.
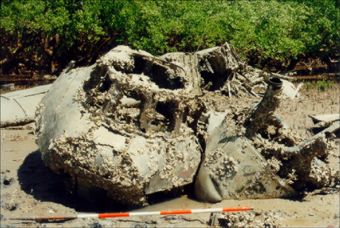
Photo 7. Bow of A24-1 with gun turret. The port engine
leans, face down against the
fuselage. Note the exhaust collector ring on the engine. Scale in 20cms
(Photo: Jung 1998).

Photo 8. David Steinberg standing at the bow of A24-1.
Scale in 20cms (Photo Jung 1998)
Photo 9. View from inside the navigator’s compartment, looking forward
through the remains of the cockpit of the A24-1 wreck site. Scale in 20cms
(Photo: Jung 1998).
Photo 10. Control yoke, without steering wheels, inside the A24-1 wreck
site cockpit (Photo: Jung 1998).
Photo 11. Captain’s rudder control pedal inside the A24-1 wreck site
cockpit. Scale in 20cms (Photo: Jung 1998).
The cockpit canopy has been destroyed and no trace was found. All of the
perspex in the gun turret was also missing, except for a panel in the
bombardier’s window at the bow. This window would have had a protective
roll-a-door cover, but this was not seen.
*(Adapted
from Jung, S. 2001. ‘Wings beneath the sea: identification of
Darwin Harbour Catalina flying boat wreck sites’. Unpublished Master
of
Arts thesis, Northern Territory University, Darwin).